How to make and send digital wedding invitations in 10 easy steps

Whether you’re tying the knot in a small, intimate ceremony or inviting everyone you know to a black tie ball, your wedding invitations set the tone and style for your big day. And when the time comes to pick out and send your invitations, we know how important every little detail is to the newlyweds-to-be.
There are so many reasons to send an online wedding invitation with Paperless Post, beyond the fact that no one can claim their invitation got lost in the mail. Paperless Post gives you the ability to choose the perfect design, customize it however you like, and easily track and manage your wedding guests, so you can spend less time stressing over missing RSVPs, and more time practicing that first dance with your fiancé (not that you need it, of course!).
From choosing your favorite font to planning your dinner menus, learn how to make and send wedding invitations that are perfect for celebrating your unique love story, in 10 easy-to-follow steps.
Table of Contents
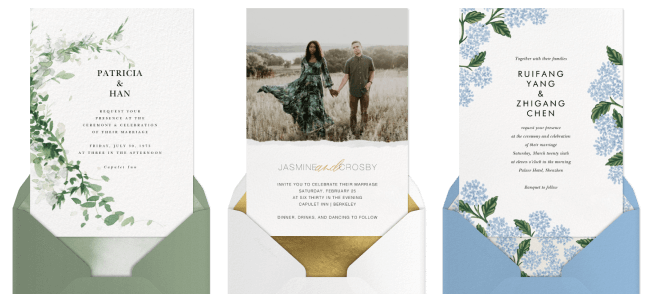
1. Browse wedding invitation designs

Whether you’re channeling an abundant rose garden or keeping things simple and sleek, our extensive collection of online wedding invitation designs has something for everyone. Filter thousands of designs and templates by style, like rustic, classic, romantic, or boho. Or browse by designer, and explore our beautiful invitations by Paperless Post design partners such as Oscar de la Renta, kate spade new york, or Monique Lhuillier. You can also filter invitations by theme, season, color, and photo count to find exactly what you’re looking for.
2. Customize your invitation design

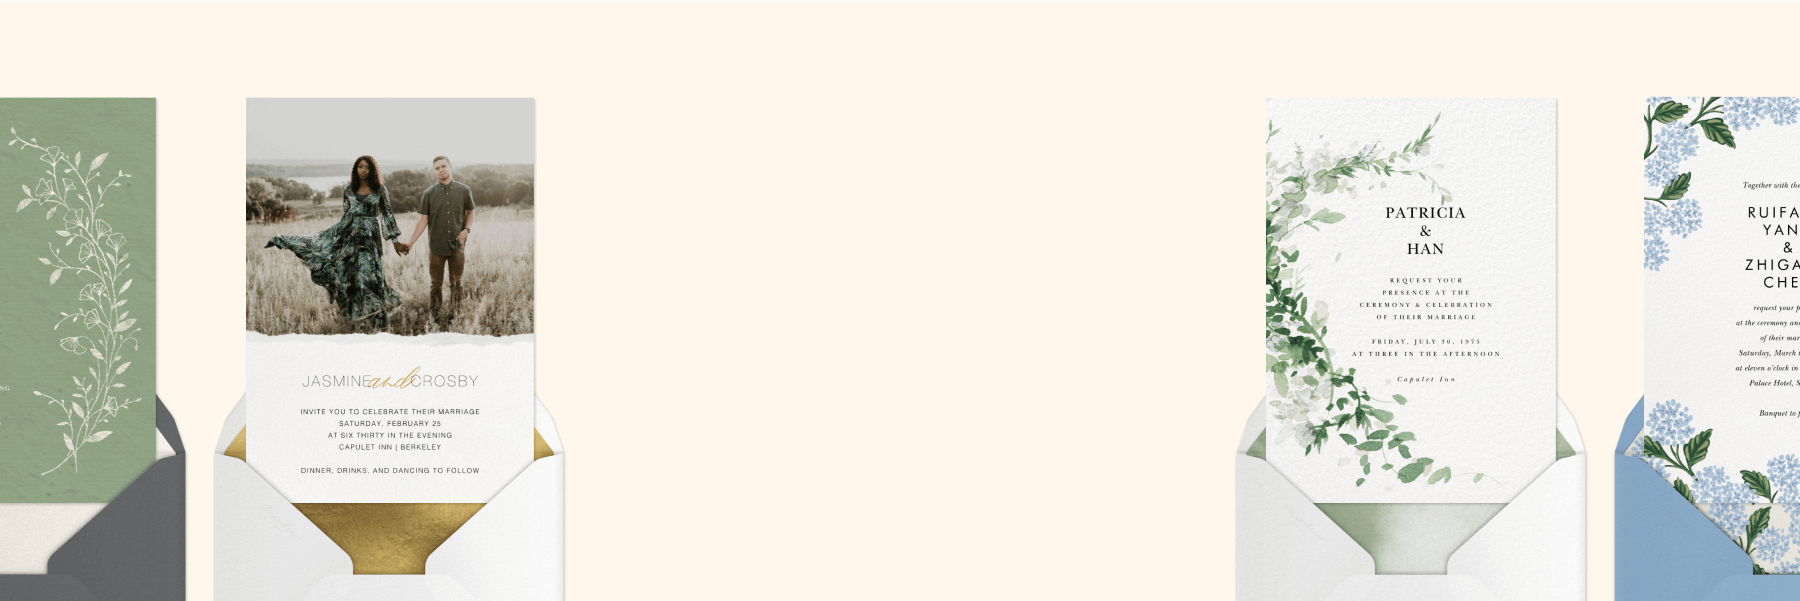
No professional design experience needed—Paperless Post makes it easy to edit your invitation’s fonts, colors, layout, and more until it looks like the exact custom wedding invitation you’ve always envisioned. You can even add a special personal touch and impress guests by uploading your monogram to your invitation.
You’ll also choose from our collection of stamps to match your Card, pick a corresponding backdrop, and select whichever envelope and liner you’d like your guests to see as they digitally open their invitations with excitement.
3. Add the details of your special day
Make sure your invitation has all the information guests will need to know as they eagerly anticipate the wedding day. Simply type everything into your design’s template: add the hosts’ names, the event date, timing information, and the location.
No need to fill up your invitation with too much wording, though, as you’ll be able to add additional details later!
4. Create an event page to match
Your event page will be where you provide all the additional information guests will need to know beyond just the date and time, so why not customize it to be just as visually cohesive and eye-catching as your invitations?
Choose from our Page Styles and select specific fonts and colors to complement your invitation design, style, and color scheme. Once everything looks just right, it’s time to add all the details, for seamless pre-wedding planning for both you and your guests alike.
5. Add helpful details with Blocks
“Watercolor Floral Garland” by Paperless Post
Include all the information guests will need as the wedding approaches, all in one convenient place. Blocks are helpful sections that you can add to your event page to relay important event details in an organized way. There are several different types of Blocks you can add to your page, such as a Schedule Block, to let everyone know the start and end times and locations for events like your welcome drinks, cocktail hour, ceremony, reception, post-wedding brunch, or anything else that may be a part of the planned festivities.
Add an Accommodations Block to relay hotel block information, and a Travel Block to provide information on any nearby airports or transportation details. A Details Block can also be useful for any additional information you want to provide, such as the dress code, venue parking instructions, driving directions, or anything else you want to communicate.
You’ll also be able to add a Registry Block, where you can attach clickable links to anywhere on the internet that you’ve set up your registry, as well as a Wedding Party Block to introduce guests to the members of your wedding party with their photos, roles, and bios. Blocks help transform your invitation into a one-stop shop (if you included your registry—a literal one!) that guests can refer back to whenever they like for helpful planning information and details.
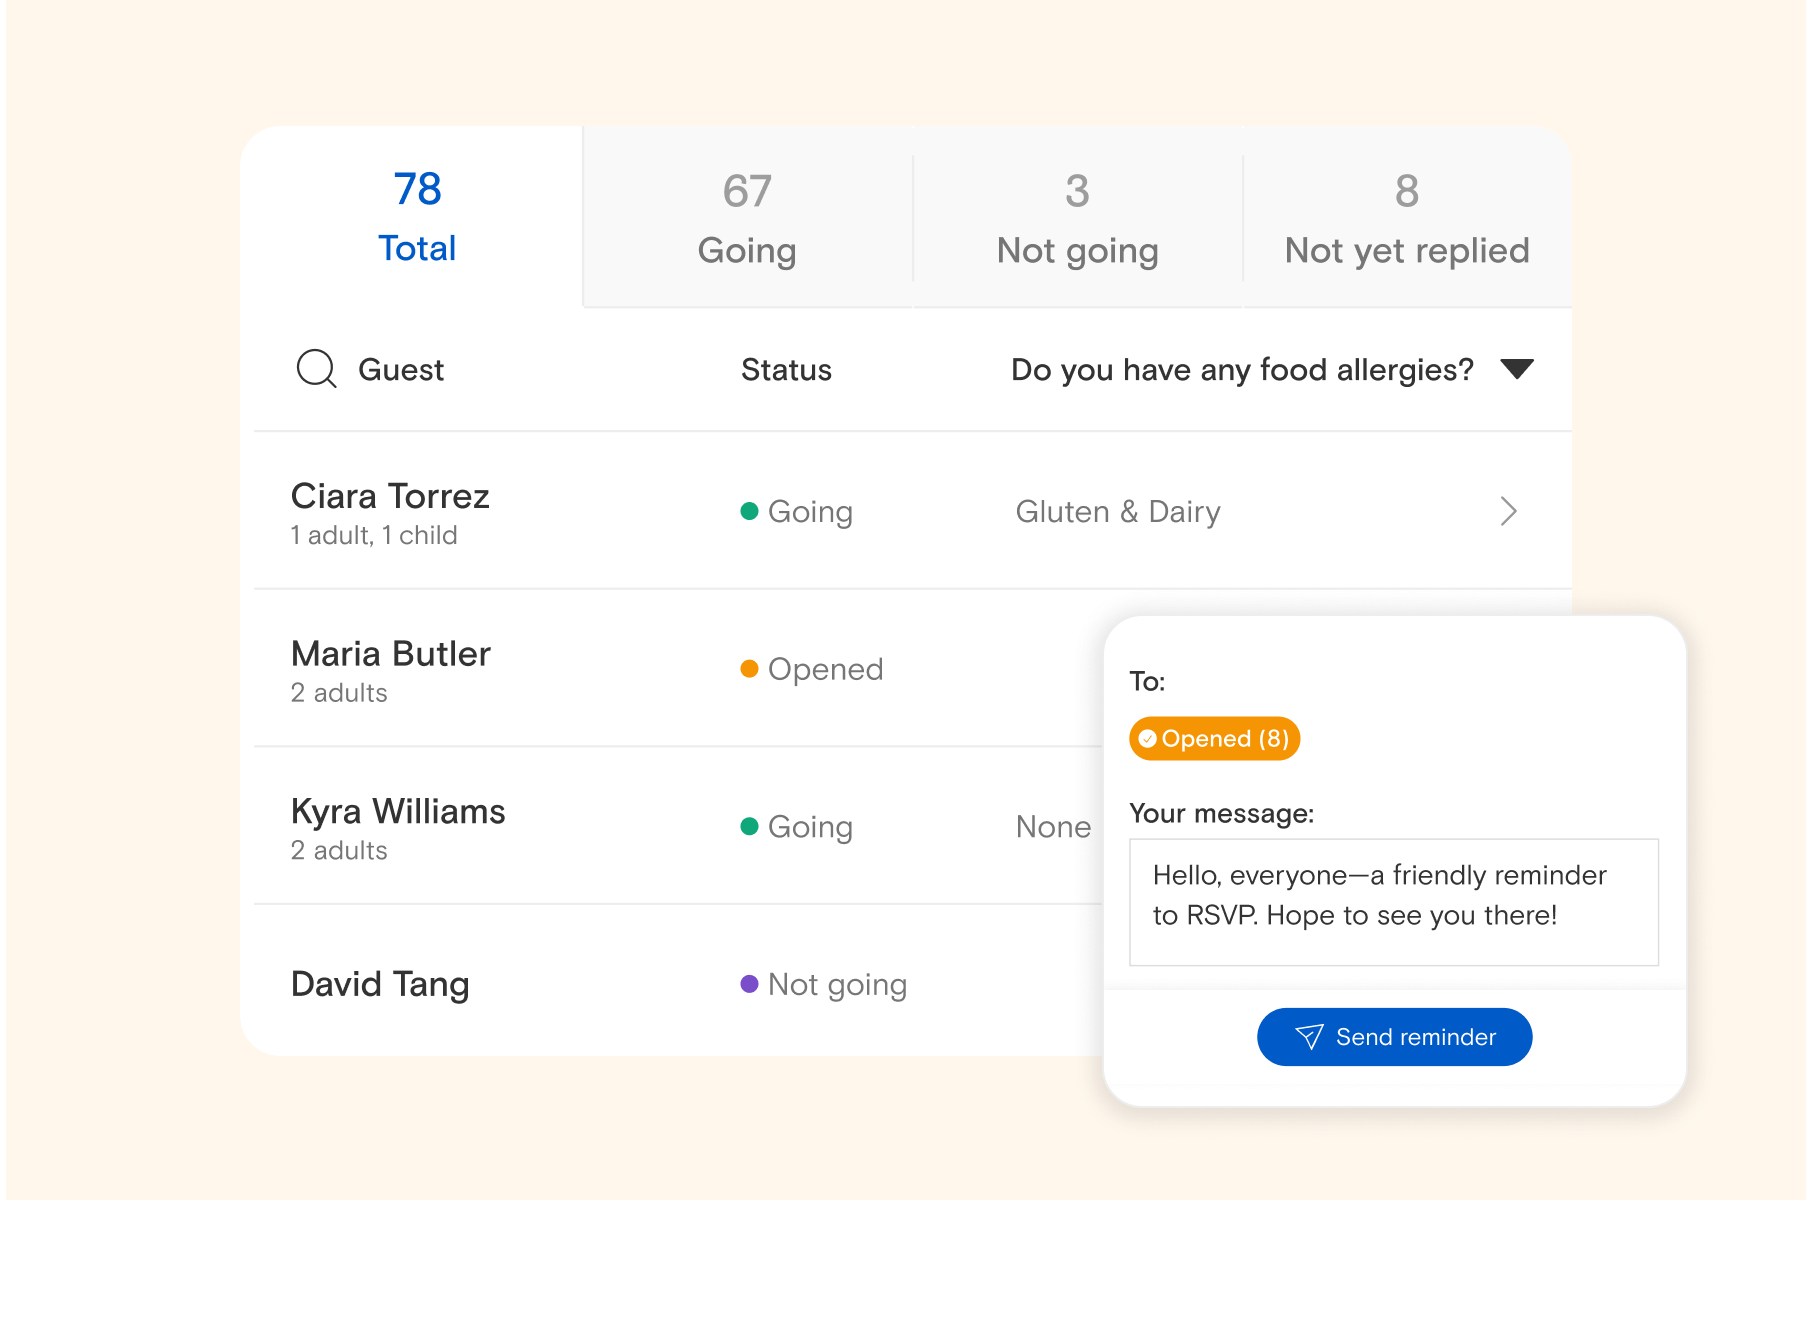
6. Gather info from guests to help you plan

Send Guest Questions with your invitation to collect useful information from your guests along with their RSVPs. Ask either open-ended, multiple-choice, or checkbox-style questions for gathering information such as mailing addresses or meal preferences.
You can even organize your guest list later based on their responses, with Guest Tags. Sort attendees into helpful categories (that only you can see), like ‘Chicken’ or ‘Fish’ or ‘Vegetarian’. That way, you’ll be able to immediately let the caterers know how many of each meal option to prepare as soon as your RSVPs start rolling in!
7. Add your guest list
Now it’s time to put your wedding’s guest list together. Add your guests manually, one at a time with their email addresses or phone numbers, upload a spreadsheet of contacts, paste a list, or connect your address book and select recipients. However you prefer to put together your guest list, Paperless Post can help you keep everything convenient and organized.
You can also send one combined invitation to a group, such as a couple or family. Each member of the group that you add will receive the invitation and can view other members of the group, but one member will be able to RSVP for everyone.
8. Preview your invitations
Before delivering the finished product to your guests, preview your wedding invitation one final time directly on our site, or email yourself a test invitation to make sure all the details are just right. Double-check for any typos and confirm that all your design choices look just as you envisioned. Then, once everything is exactly to your liking, get ready to hit send!
9. Send them out, your way
 Deliver your polished wedding invitation to guests via email, text, or a shareable link. If you’re sending your invitations via email, you can also customize the message that guests will receive in their inboxes. Choose from fonts and colors to match the email to your invitation style, so guests will be impressed from the very first open.
You can also create a shareable link to your wedding invitation, which also gives you the option to create a customizable URL and add password protection. Create a memorable URL so that guests will be able to easily refer back to your wedding link for the pertinent details, such as the dress code and schedule of events, as they prepare to dance the night away.
10. Wedding planning at your fingertips, with our app
For updates on the go and instant notifications to help you stay totally on top of your wedding planning, download our Paperless Post app. Track RSVP statuses in real-time and message your guests individually or as a group, without even opening a laptop. With our app, you can manage the details of your wedding at the same time as you’re getting your bridal pedicure or tasting cake options – who could ask for more convenience than that!
Plan your dream wedding with Paperless Post

From the romantic proposal through the thoughtful thank you notes, let Paperless Post help you every step of the way to plan the wedding you’ve always dreamed of. Browse our collection of customizable save the dates to kick things off, and then choose from thousands of beautiful online wedding invitation designs in any style.
Need help coming up with the perfect wording for your wedding invitations? We’ve got you covered there as well. Figuring out the correct etiquette for addressing invitations to multiple family members or guests with titles? We can help with that. Want to know when to actually send those invitations? Paperless Post is here to advise you on it all. Plan your incredible wedding with ease with Paperless Post, so you can be free to soak up every special moment of the day you’ll remember forever.
Customizable designs from Oscar de la Renta, Rifle Paper Co., kate spade new york, and more.